Is a warmup routine really necessary? We know intuitively that we are not likely to take the horn out of the case, slap on a reed, and dive right into the Glazounov Concerto or John Coltrane’s “Giant Steps.” We need, at least, a few minutes to remind our ear and muscles what we want to sound like and what it feels like to create that sound. The fingers and the tongue need to limber up and get reacquainted.
The best way to do all that might vary greatly from one person to the next, as might the time allotted. The routine outlined below is intended as a starting point which each player can personalize as needed. It has been helpful for many students and for myself. In the interest of full disclosure, I should say that when I do this routine, I follow my instincts about how long to spend on each part. I also intersperse some random playing of short, memorized or improvised phrases as my instincts dictate.
The recommended times for each category add up to a range from approximately 15 to 35 minutes. I can imagine it taking as little as 5 minutes or as much as an hour. The important thing is to address each category on a regular basis. It is also beneficial to return to some of these exercises, briefly, throughout a practice session. The following is a recommended routine and explanations of each part.
A few things to keep in mind:
- This routine is suggested for classical and jazz playing. The only adjustments required being for a different performance style, such as when working on tonguing.
- There are many other exercises that are great for developing sound and pitch control. Explore them as well.
- Use a tuner and/or a drone pitch throughout all these exercises.
- The default dynamic should be forte. This encourages the best air support. But, also change up the dynamics from time to time.
The Routine
- Mouthpiece Exercises (1 to 5 minutes)
- Tuning (30 seconds to 1 minute)
- Overtones (5 to15 minutes)
- Low Register Development (3 to 5 minutes)
- Tonguing (5 to 10 minutes)
Exercises Explained
Mouthpiece Exercises: (1 to 5 minutes)
Any deficiencies we may have on the saxophone become much more obvious when playing the mouthpiece by itself. If we can learn to control our sound, pitch, and articulation on the mouthpiece, all those things become much easier and are much improved on the saxophone.
- Learn to produce a big, steady, and clear sound playing only the mouthpiece.
- Produce a desired pitch on the mouthpiece. (Concert C for soprano, A for alto, G for tenor, and D for bari, or slightly lower for each when using a jazz mouthpiece.) Start with an arched tongue position, as if making the vowel sound “EE.” If the pitch is higher than desired, relax the jaw pressure but maintain the “EE” vowel sound.
- Learn to articulate clearly without changing the pitch. This is usually a matter identifying and eliminating any motion of the jaw and minimizing unnecessary movement of the tongue.
- Learn to move the pitch down and back by changing (independently) the tongue position and jaw pressure. At first you may barely be able to move the pitch at all. Eventually, you will be able to play scales and melodies.
Tuning: (30 seconds to 1 minute)
- Tune a written, fifth line F#. Be sure to play just as you did on the mouthpiece, with the same amount of pressure, air support, tongue position, etc.
- Check the middle, open C#. If it is flat, push the mouthpiece in just enough to bring it up in tune. Recheck the F#. If it is sharp, relax jaw pressure slightly.
- Check all F#s and C#s on the horn. These are good notes to check due to the tendency of the middle C# to be flat and the higher C# to be sharp. The intervals of 4ths and 5ths are good intervals to hear intonation. We must push the mouthpiece in enough to bring flatter notes up and learn to bring the sharper notes down by the way we play them. (Relaxing jaw pressure and/or changing tongue position.)
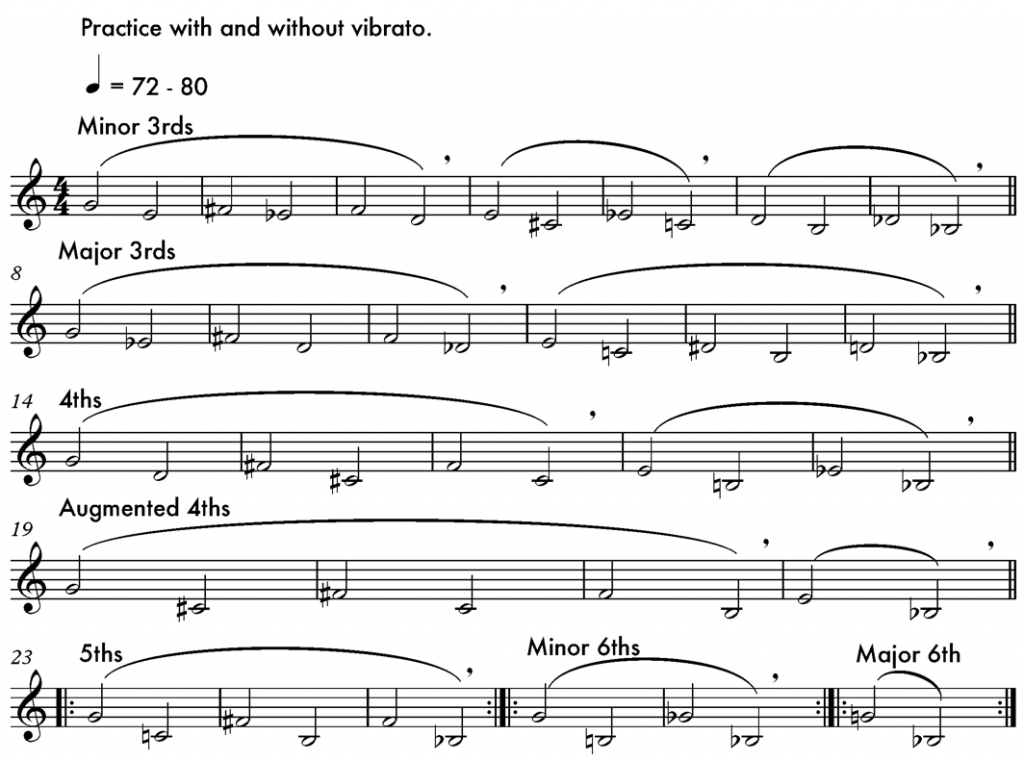
- While sustaining the concert A and E (for alto) or E and B (for tenor) on a keyboard, slur through the sequence below. Listen not only for intonation, but also for complete connection from note to note and a uniform tone quality. The high F# could also be included.

Overtones: (5 – 15 minutes)
Countless books and internet videos address playing overtones on the saxophone. Rather than a lengthy discussion on the topic here, I will present the basics and a couple of exercises to get started.
All sounds produce a fundamental pitch and a series of overtones referred to as partials. Brass players must learn, very early, to select among several partials available with each valve combination or slide position. We can do this on the saxophone as well with tremendous benefits to all elements of our playing including learning to play in the altissimo register.
When fingering a written low B-flat, the following overtone partials are created and available to be selected for emphasis.

Virtually all beginners play an overtone the first time they try to play a note in the lowest register. For example, fingering a low C usually produces a third space C. Gaining control of this phenomenon is our goal.
In his book Voicing: An Approach to the Saxophone’s Third Register, Donald Sinta recommends an introductory exercise in which we alternate between low and middle F without using the octave key. A good approach to this, one that even beginners are able to do, is to alternately play a low F and middle F several times, with the octave key, then repeating the upper F without using the octave key. It is very important to avoid using extra jaw or embouchure pressure to produce the upper octave.

When you can do this comfortably, move to the nearby notes (the E below, the F# above) until you can do it on every note from low G down to low B-flat.
Next, work on gaining control of the third partial.
Start by playing a fifth line F with the normal fingering, including the octave key.
Continue holding the F as you close additional keys in the following order until you are fingering a low B-flat with the octave key while continuing to sound the middle F.
- Close the low B-flat key.
- Close the low C key.
- Close the other right hand keys.
Finally, if you are still sounding the middle F, release the octave key. You should now be playing a middle F while fingering a low B-flat. You have selected the third partial. Briefly, stop blowing, keep the F in your ear, and go right back to it, still fingering the low B-flat.
The next step is to be able to select between the low B-flat and the middle F, the same way you did between the low and middle Fs. Keep all the keys closed and move between the 1st and 3rd partials. If you need to use the octave key for a while, that’s fine. But, if you do this regularly, soon you will not need the octave key. Remember not to add pressure for the upper partials.
Do the same using low B and Low C as the fundamental. (It gets more difficult with D-flat and D, but the same principles apply.) Take a similar approach to getting control of the 4th, 5th, and higher partials.
There are many exercises utilizing overtones including:
- Matching the sound characteristic of the regularly fingered note with the overtone on the same pitch. (Often called “tone matching”)
- Playing the third partial, relaxing the upper lip and letting the fundamental sound, without dropping the jaw. This is a good exercise to help correct a bunched chin.
These two exercises were introduced to me by my teacher at the University of Northern Colorado, Roger Greenberg. He credits Joe Allard for emphasizing the importance of overtones to him as he did with so many students who went on to great success including jazz tenor sax greats, Bob Berg and David Leibman. In fact, Bob Berg once told me that he owes finding his own sound to Joe Allard.
Of the many excellent books addressing overtones on the saxophone, I recommend starting with Top Tones for Saxophone by Sigurd Rascher.
Low Register Development: (3 to 5 minutes)
Perhaps because of the fact that the saxophone is a conical bore instrument, the low register can be particularly challenging for many. The exercise shown below can be helpful. DO NOT drop the jaw to try to help low notes speak easier. It doesn’t work. Maintain a constant, moderate jaw pressure. Work to focus the airstream so it is efficient and makes the reed vibrate. As the interval expands, it may become harder to make the low note respond without a break in the sound. Repeat those intervals, making adjustments to embouchure and air support until the connections are seamless. Remember not to change anything as you go to the lower note. We are looking for that way of playing the horn that makes it respond the same in all registers.
Tonguing: (5 to 10 minutes)
The following exercise is from The Saxophonist’s Workbook by Larry Teal. He recommended repeating this on every note on the instrument, starting on the low G and moving up chromatically, and then starting again on the low G and moving down chromatically to the low B-flat. This is a great thing to do, but requires more time than we may have in a particular session.
If time is short, I recommend doing this on several random notes in the middle register to begin. But, make sure to do every note from high C and above, and every note from low D and below every day.

Several variations are presented in Teal’s book. The next one alternates between two notes a whole step apart.

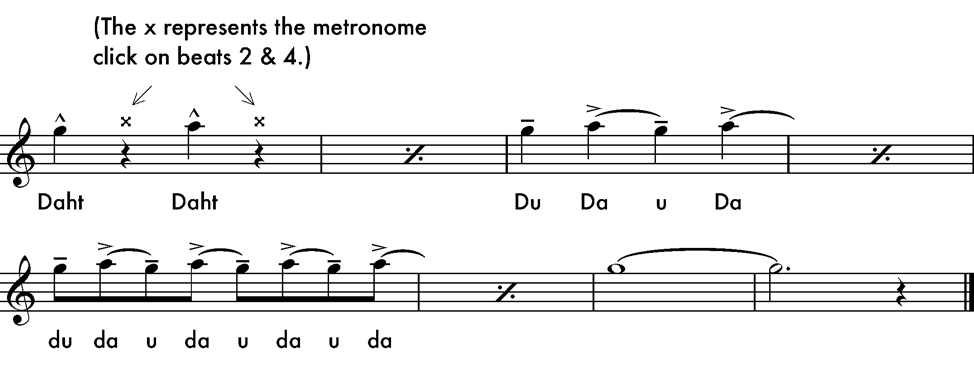
Jazz articulation is very different from classical articulation and beyond the scope of this discussion. However, presented below is a way of adapting the Teal exercise above into a way of practicing jazz style phrasing.
Play this with swung eighth notes beginning at a tempo of about quarter note = 120 beats per minute (bpm). Move the tempo up gradually as you become comfortable. Between 140 and 160 bpm, try setting the metronome at half that speed and hearing the click as representing beats 2 and 4. This will be tricky at first, but it is great for improving your swing feel.
Try to tongue without creating any space between the notes. This should be LEGATO tonguing.
The syllables below the staff represent a way of verbalizing the articulations and accents.